
Koshi-guruma Explained!
The Hip Wheel That Will Transform Your Forward Throw
The Koshi-guruma is one of judo’s most elegant hip throws, yet many novices miss the critical hip placement that makes it work. Let’s fix that. There’s a moment in every poorly executed hip throw where you feel the opponent slip off your hip and land beside you—or worse, drag you down with them. That moment is usually the result of rushing the entry or neglecting the fundamental mechanics that separate Koshi-guruma from a desperate headlock. By the end of this breakdown, you’ll understand exactly why the “hip wheel” works and how to execute it with the precision of a seasoned judoka.
What Is Koshi-guruma?
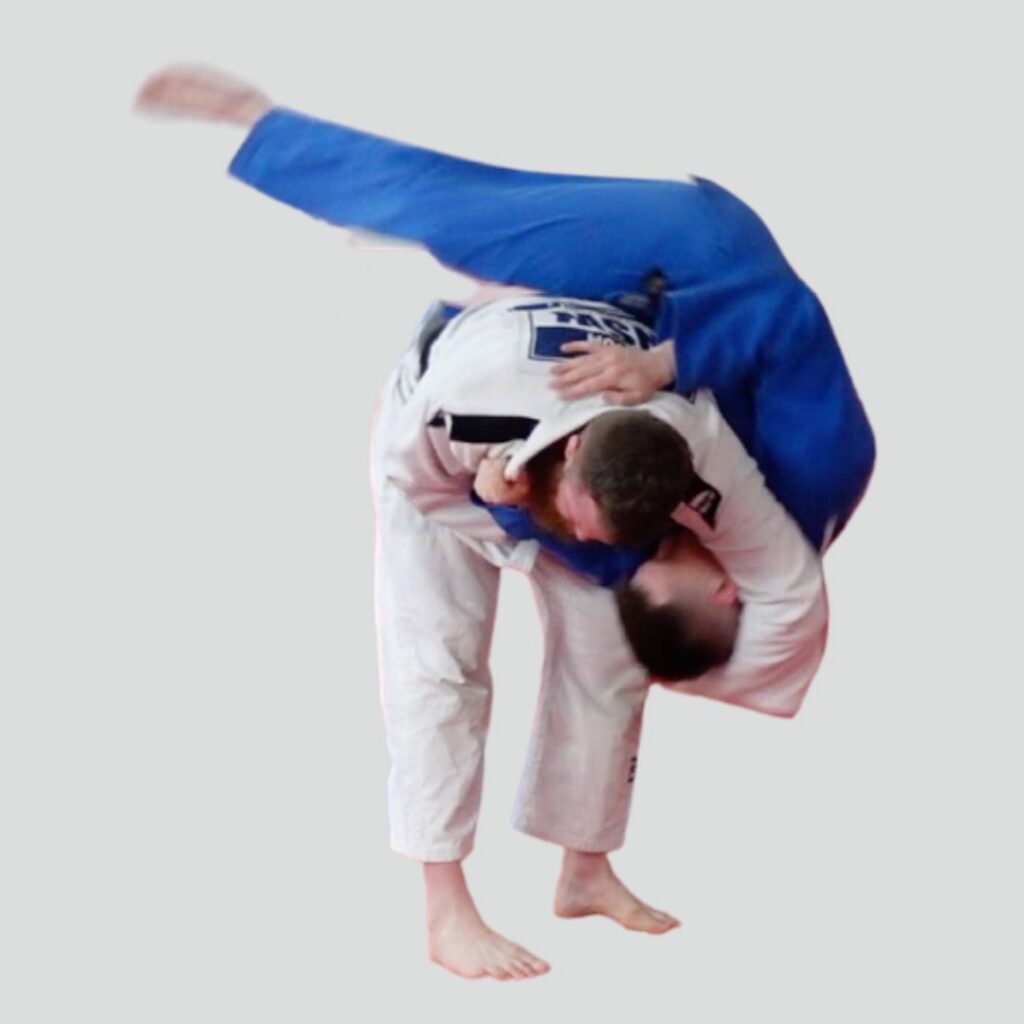
Koshi-guruma (腰車) translates directly to “hip wheel” —and that image is your key to understanding the technique . Unlike O-goshi, where you wrap your arm around your opponent’s waist, Koshi-guruma sees you controlling the opponent’s head and neck with your armpit and arm .
This is one of the original 40 throws of Kodokan Judo, developed by Jigoro Kano and classified as a Koshi-waza (hip technique). It belongs to the Dai Nikyo (second group) of the traditional Gokyo throwing list, which places it alongside foundational throws that every serious judoka should master .
When executed correctly, your hip acts as a fulcrum, and your opponent rotates around it like a wheel—hence the name. The neck grip provides exceptional control, allowing you to dictate the direction and angle of the throw while keeping your opponent’s posture broken .
One important note: In many junior competitions (under age 12-14), Koshi-guruma is restricted or banned due to the neck grip, so check local rules before teaching it to younger athletes .
The Three Pillars: Kuzushi, Tsukuri, Kake
Like any proper judo throw, Koshi-guruma lives and dies by the three-phase progression. Skip one, and the throw collapses.
| Phase | Japanese | What Happens |
|---|---|---|
| Off-balancing | Kuzushi | Break opponent forward and slightly to your side |
| Fitting in | Tsukuri | Pivot, wrap the head, insert the hip |
| Execution | Kake | Extend legs, rotate, wheel opponent over |
Kuzushi (Off-balancing)
You cannot throw someone rooted to the ground. The first step is destroying their posture and shifting their weight onto their toes—or ideally, past them. For Koshi-guruma, you want your opponent’s momentum coming forward and slightly to your right side (for a right-sided throw) .
How to create kuzushi:
Start with a standard collar-and-sleeve grip. Your left hand pulls the sleeve up and across your body while your right hand (collar grip) pulls forward and slightly upward. You’re not yanking—you’re generating a wave of motion that draws your opponent onto their toes. A common approach is to take a small step backward with your right foot, which invites your opponent to step forward with their left foot. The moment that foot lands, their momentum is committed, and you strike .
Pro tip: Think of breaking balance like opening a window. Your sleeve hand lifts and pulls across your body, creating space for your hip to enter. This is sometimes called “opening the window” in coaching circles .
Tsukuri (Fitting in)
This is where beginners panic—and where Koshi-guruma differs dramatically from other hip throws.
With kuzushi established and your opponent leaning forward, you now:
1. Release the collar grip and shoot your right arm around your opponent’s neck. Your right armpit should clamp down over the back of their head, with your forearm resting across their collarbone or chest. Do not choke—this isn’t a headlock. The arm is a frame, not a noose .
2. Pivot on your right foot, swinging your left foot into position. Your feet should end up roughly shoulder-width apart, toes pointing in the direction you intend to throw. Your hips must drop below your opponent’s center of gravity—which means bending your knees, not your waist .
3. Your back should make full contact with your opponent’s chest. This is non-negotiable. If there’s daylight between you, the throw will fail. Your left hand maintains the sleeve grip, pulling your opponent’s arm tight against your body so their posture stays broken .
A common mistake: Practitioners try to wrap the neck by reaching over the head like a guillotine. Instead, imagine sliding your arm through their neck like threading a needle—your bicep contacts their far shoulder, and your forearm lies flat across their chest .
Kake (Execution)
This is the “wheel” part. With your opponent loaded onto your hips and their head controlled, you execute by:
1. Straightening your legs explosively. This lifts your opponent’s feet off the ground—the critical moment where you know you’ve succeeded .
2. Rotating your upper body while simultaneously pulling your sleeve hand tight to your body and punching your right arm (the “head” arm) down and across your body, toward your left hip. This wheeling action rotates your opponent around your hip axis and drives them into the mat .
3. Following through into a pin. If executed correctly, you should land directly in Kesa-gatame (scarf hold), with your opponent pinned beneath you .
Key Technical Details That Make It Work
The Neck Grip: Control, Not Constriction
The arm placement is everything. Your right armpit should clamp the back of their head, but your forearm should rest across their upper chest, not their throat. Pressing the forearm into the throat crosses into illegal technique territory (and frankly, it’s poor judo) .
Drill this at home: Stand facing a wall, place your right arm around the corner, and practice sliding into position so your armpit contacts the corner while your forearm stays flat against the wall. That’s the feeling.
Footwork: Pivot, Don’t Step
Many beginners take a giant step backward to enter the throw, which actually pushes their opponent away from them. Instead, pivot. Your right foot stays planted as a post while your left foot swings around. Your opponent should feel like they’re being drawn into you, not chasing you .
Hip Height: Lower Than You Think
You cannot throw someone who is above you. In Koshi-guruma, you must bend your knees deeply enough that your hip joint sits below your opponent’s belt line. The power comes from the legs straightening, not from your back. If your back hurts after practicing this throw, your mechanics are wrong .
Who Should Use Koshi-guruma?
Koshi-guruma tends to favor taller practitioners with longer arms . The reason is simple geometry: reaching around a shorter opponent’s head is difficult if your arms aren’t long enough to maintain chest-to-chest contact. Shorter judoka often find more success with O-goshi, where the arm wraps the waist instead of the neck.
That said, Koshi-guruma remains an excellent forward throw for anyone facing an opponent who pushes aggressively into them. When your opponent’s momentum is committed forward, the hip wheel becomes a devastating counter .
Famous Judoka Who Mastered Koshi-guruma
Teddy Riner, the legendary French heavyweight and 10-time World Champion, has famously used Koshi-guruma throughout his career—though the throw is so seamless in his arsenal that casual viewers often mistake it for a variation of Uchi-mata. His height (6’8”) makes the neck grip particularly effective, as he can control shorter opponents from above while inserting his hips underneath them .
Kosei Inoue, another Japanese heavyweight legend, has also demonstrated masterful Koshi-guruma mechanics, particularly in transitioning from the throw directly into pins and submissions .
For modern instruction, Olympic Silver Medalist Travis Stevens has produced an authoritative video encyclopedia on Koshi-guruma that breaks down the technique from solo drills to full application .
BJJ Cross-Trainers: Why You Need This Throw
If you’re coming from Brazilian Jiu-Jitsu, Koshi-guruma is a goldmine. Unlike many judo throws that land you in guard or require complex transitions, Koshi-guruma deposits you directly into Kesa-gatame (scarf hold) —one of the most dominant pinning positions in BJJ .
From there, you have:
- Arm attacks (straight armlock, Americana)
- Chokes (paper cutter, baseball bat)
- Transition to mount or side control
Koshi-guruma is also safer for BJJ practitioners to learn than more explosive throws like Harai-goshi or Uchi-mata, as the mechanics emphasize control over momentum.
Instructional Resources
- Kodokan Judo Official Koshi-guruma – Search YouTube for “Kodokan Koshi Guruma” for the canonical demonstration from judo’s headquarters .
- Jimmy Pedro & Travis Stevens – Koshi Guruma Encyclopedia – A comprehensive video breakdown from two of America’s most decorated judoka .
- Chadi (BudoDragon) – Excellent written and video breakdowns of the mechanics for English-speaking practitioners .
Conclusion: Wheel, Don’t Muscle
Koshi-guruma is not a strength throw. If you find yourself straining, gripping desperately, or feeling like you’re wrestling a bear, stop. Revisit the kuzushi. Check your hip height. Relax your arms.
Remember the image: a wheel turns effortlessly because it’s balanced on its axle. Your hip is that axle. When your opponent is loaded correctly, the throw requires no more effort than rotating your upper body and straightening your legs. Let the wheel do the work.
Now get on the mats—and keep the grip legal.
Disclaimer
This article is for informational and educational purposes only. All techniques should be practiced under the supervision of a qualified instructor with appropriate mats and safety equipment. Improper execution of throwing techniques can result in serious injury. The author and [Blog Name] assume no responsibility for injuries sustained while practicing these techniques.
Liked this breakdown? Check out our upcoming technical guides on Harai-goshi, O-soto-gari, and the art of kuzushi. Subscribe for weekly content delivered straight to your inbox.